Make your own Santons de Provence

Make your own Santons de Provence

Come learn about Santons de Provence, a beautiful French Christmas tradition. Then make your own French-inspired nativity scene with a little clay, paint, and creativity!

The idea of a nativity scene began with Saint Francis in Italy in the 1200s.  He brought together real people and animals to create a living nativity. (If you would like to read a lovely children’s book that includes the story of the Saint Francis’ nativity, we recommend the first book in the Loupio series. It was originally written in French, but is also available in English.) 

Churches over the years have displayed large nativity scenes. However, when there was a revolution in France in the 1700s, it was sometimes not possible for people to go to church. The French people started making small nativity scenes for their homes.

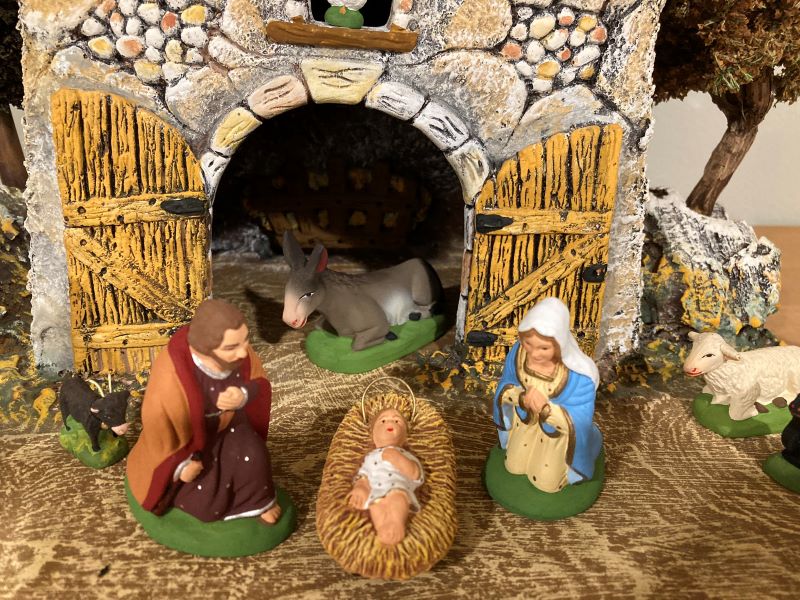
In the 1800s, Santons de Provence began to become famous in the south of France.  Santons (meaning “little saints”) are commonly made of clay and painted by hand.

Santons de provence villagers

Santons de Provence nativity scenes include not only the Holy Family, but also many other people (such as a baker, a teacher, a doctor, a mom and her child, and countless other people).

Santons de Provence remind us that we are all called to come adore the Christ Child in the manger.

Santons de Provence

Santons de Provence remind us that we are all called to come adore the Christ Child in the manger.

Our family’s Santons de Provence collection began with baby Jesus, Mary, Joseph, and a donkey, and over the years it has grown. Each year we add a new figure or two. Sometimes the added figure relates to our life that year, for example a mother and a child when a new baby was born in our family, and an apothecary during the COVID pandemic. Our scene also includes Saint Francis, as he is a dear saint to our family and to remember that he began the idea of nativity scenes.

Having a Santons de Provence collection is a beautiful Christmas tradition. Our family looks forward to setting out the scene each Advent, and the first thing we do on Christmas morning is to come to see that baby Jesus has been placed in the stable. 

If you are interested in starting your own collection, and planning a trip to France is not a possibility, there are a number of online stores that sell Santons de Provence. We have ordered Santons from Santons de France USA for many years.

If you would like to create your own Santons de Provence-inspired nativity scene, keep reading to learn about a few ways to create your own nativity scene.

Ready to create your own Santons?

Santons de Provence are typically made from clay, so for authentic but simple material for making your own santons, we recommend terra cotta color air dry clay. Once it dries, the clay can be painted with acrylic paint. You may want to use clay tools for more detailed work.

diy santons de provence

Despite air dry clay being a more authentic material, we have found that using Model Magic makes for a project that avoids mess and also creates sturdy figures (ready for little hands to play with!). Here is a link for a class pack of Model Magic (in our family, we love having this on hand for many fun projects), but small packages are also available.

Toothpicks may be helpful to support the clay as it dries and to add details or texture.

Model Magic can be painted after it dries with watercolor paint. Any watercolor paint will work, but higher quality water color may work best. If the figures are small, fine-tipped paint brushes will be helpful for details.

diy santons de provence

Part of the fun of making your own Santons de Provence inspired nativity is that figures can be created that are special to you and your life. For example, our 11-year old loves bunnies, baking, and playing the guitar, so she created some new santons to add to her collection this year inspired by these loves. Making a patron saint figure would also be lovely. Of course making your own santons does not mean they need to look exactly like Santons de Provence, you can create your own style, as our daughter did.

diy santons de provence

Before making your own Santons de Provence inspired nativity, you might enjoy watching some authentic Santons de Provence creators at work in France. We’ve gathered up a collection of videos below that show the creators at work. The videos are in French, so if you are new to French, just watch (and perhaps you’ll recognize a French words too!). You’ll be able to see the great variety of santons that are made. You’ll also see that santons are made using a molds in order to mass produce many of the same type of santon. However, the molds are produced from originally sculpting a santon out of clay, so for making your own santons, you will not need a mold… just create your own originals by sculpting your clay. 

We hope you enjoy making your own Santons de Provence-inspired nativity scenes, or perhaps start an authentic Santons de Provence nativity collection to add even more joy to the Christmas season! 

Joyeux Noël !

Que Dieu vous

bénisse!

santons de provence

Note:  Some links on this page are Amazon Affiliate links.  Sparkles and Sprinkles is a participant in the Amazon Associates Program, an affiliate advertising program designed to provide a means for sites to earn advertising fees by advertising and linking to Amazon.com.

Other links may or may not be affiliate links.  We provide links because we have found these products or services beneficial, and we think you might too.

Make a city plan like L’Enfant

Make a city plan like L’Enfant

Have you ever thought about the fact that someone had to design and plan the cities where we live? In this post, we share with you a little history of the designer of our nation’s capital, Washington, D.C. His name? Pierre Charles L’Enfant.

pierre l'enfant statue in u.s. capitol building

We wish we could have found a great picture book for children to learn about L’Enfant (like the one we found about Jean-Jacques Audubon), but as we could not find one, this post is full of pictures and little snippets that tell the story of the intriguing life of Pierre Charles L’Enfant, a Frenchman with a great love of America.

After learning a little about L’Enfant, we’ll show you a fun art project to plan your own imaginary city, using L’Enfant’s methods. You can even learn some French city words, with our free chart, as a nod to L’Enfant’s native language.

And, if you are up for an adventure, we suggest some places in the D.C. area you can visit which honor the designer of our nation’s capital – scroll to the bottom of this post to find these fun places.

scott berg grand avenues

A few little notes… This post was inspired by reading Grand Avenues by Scott W. Berg – it’s a history book, but it is written like an enthralling novel. I would recommend it to adults reading this post, especially those with a penchant for French and a love for Washington D.C. For children, or those wanting a quick snapshot, our post should be a nice place to start. Pictures in this post are mostly public domain images. In many cases, clicking on the images will lead to the source of the photos if you want to dive deeper. Okay, let’s learn about L’Enfant…

Who was Pierre Charles L’Enfant?

pierre charles l'enfant

Major Peter Charles L’Enfant, redrawn from woodcut (Library of Congress)

Pierre L’Enfant was born in France in 1754.  His father was employed by King Louis XV as a royal artist. Pierre L’Enfant studied at the Royal Academy of Painting and Sculpture.  One of his contemporaries was Jacques-Louis David, who became a famous artist.

academie royale de peinture et sculpture

Vue perspective du Sallon de l’Académie Royale de Peinture et de Sculpture au Louvre (1778)

l'enfant painting

Painting by L’Enfant of West Point, 1782 (Museum of the American Revolution)

Pierre L’Enfant’s family was close with the famous playwright Beaumarchais (author of plays such as The Barber of Seville and The Marriage of Figaro). Beaumarchais encouraged a group of young men at the time to travel to America to help to fight against the English in the American Revolution. L’Enfant did not have military training, but he wanted to come to America to join in the fight for American independence.

Soon after his arrival in America, L’Enfant met George Washington. George Washington was impressed with L’Enfant, especially with his artistic abilities.  L’Enfant was asked to draw a military manual for General Baron von Steuben. L’Enfant was also asked to create the medallions for the Society of the Cincinnati. Later, L’Enfant took on a bigger project, redesigning Federal Hall in New York City.

stueben manual l'enfant

L’Enfant’s drawing for Steuben’s military manual (Muesuem of the American Revolution)

When the Revolutionary War had been won and it was decided that the new country should also have a new capital city, L’Enfant was determined to be the designer of this great city. George Washington thought that L’Enfant was the one who had the genius for this job.

“Since my first knowledge of [L’Enfant’s] abilities in the line of his profession, I have received him not only as a scientific man, but one who added considerable taste to his professional knowledge; and that, for such employment as he is now engaged in, for projecting public works, and carrying them into effect, he was better qualified than any one who had come within my knowledge in this country, or indeed in any other…”

(Letter from George Washington to David Stuart, as quoted in Grand Avenues, pages 136-137)

L’Enfant explored and surveyed the land that would become Washington, District of Columbia. Then L’Enfant meticulously designed a grand city to be built there. At the time, Georgetown was a little village and most of the area that would become Washington D.C. was farmland and forest.

washington d.c. farmland

Unknown author – Library of Congress Geography and Map Division

From his tireless study of the land, his vast imagination, and artistic talent, L’Enfant created a plan for the new capital city. He created his plan on 2 pieces of handmade paper (joined together to be 2 feet by 3 feet), using pencil and watercolor for the images, and many styles of calligraphy for the descriptions.

enfant plan for dc

L’Enfants hand drawn plan for Washington, D.C. (public domain image)

L’Enfant had a fiery personality, however, and sometimes offended the other people working in government at the time. Interestingly, the plan that became engraved and publicized had the name of one of L’Enfant’s helpers, Ellicott, who had copied and slightly modified L’Enfant’s plan. L’Enfant was enraged that after all of his hard work, his name was not the one on the published plan. Due to disagreements and financial difficulties, the plan for D.C. was slow to become a reality.

About 100 years went by without much progress on the grand plans for Washington, D.C., then L’Enfant’s original plans were unearthed by Frederick Olmsted, Jr., a highly acclaimed architect.  The McMillan Commission then attempted to more fully understand L’Enfant’s plans. The commissioners even traveled to Paris to see where L’Enfant grew up and what might have inspired his plans.

Finally, L’Enfant’s plans for a grand city for our nation’s capital began to be realized.

mcmillan plan

The McMillan Plan for the National Mall

Perhaps it is because of L’Enfant’s original plans and the McMillan Commission’s work in carrying out his plans that Paris and Washington D.C. have some similarities, among them, grand diagonal avenues, long grassy esplanades, French Second Empire and Beaux-Arts style buildings, and ornate bridges. Let’s take a look…

paris map

Map of Paris in 1774

enfant plan for dc

L'Enfant's plan for Washington, D.C.

Paris - Champ de Mars

D.C. - The National Mall

Paris - Opéra Garnier

D.C. - Eisenhower Executive Office Building

Paris - Pont Alexandre III

D.C. - Arlington Memorial Bridge

Photo by Tim Evanson from Washington, D.C., United States of America

Ready to plan your own city?

L’Enfant used large pieces of handmade paper for his plan. For your plan, you will need large pieces of watercolor paper, watercolors, paint brushes, and pencils and/or pens.


L’Enfant spent a great deal of time exploring the land on which he planned our nation’s capital, deciding, for example, what buildings would look best on hills and what areas should be near water. To add even more fun to your imaginary city plan, it could be fun to spend time wandering in a country or farm area, and imagine how that piece of land could be turned into a city or town.

Once you have some ideas, start to sketch them out on your paper with pencil. Label your map in pen or pencil and add some watercolor (perhaps blue for rivers, green for parks, etc.). You could also add explanations about your map, using pen or pencil, or even try calligraphy as L’Enfant did. Decide on a name for your city, and give your map a fancy title.

If you are interested in learning French while making the city, feel free to print a copy of our French City Word Chart. Though L’Enfant made his map with English labels, it could be fun to label your map in French, L’Enfant’s native language.

If you need help with pronunciation of these city words, you could try Narakeet. Simply select French as the language, type the French word, and listen to the pronunciation.


French city words

Ready for a L’Enfant in D.C. fieldtrip?

L’Enfant was at first not honored for his great work in designing our nations capital, but now we can find a number of places around Washington, D.C. that remind us of L’Enfant’s contribution to our country. Let’s explore…

L'Enfant Plaza

L'Enfant Plaza with metro and train stops

l'enfant statue u.s. capitol

Statue of L'Enfant in the United States Capitol Building

The statue of L’Enfant in the Capitol is quite new, installed in 2022. Watch a video of the instatlation. The statue is tucked in a quiet alcove… a big thank you to our wonderful tour guide who took the time to show us this statue, though it was not part of the standard Capitol tour.

L'Enfant's tomb in Arlington National Cemetery

L’Enfant’s remains were transferred to Arlington National Cemetery about a century after his death. His tomb overlooks the capital city he designed.

Freedom Plaza in D.C.

At Freedom plaza one can walk on a stone inlay that depicts a portion of L’Enfant’s plan for Washington, D.C. (photo from wikimedia)

Is it possible to see the original plan created by L’Enfant? Unfortunately not. We read in Grand Avenues that “The only known copy of a plan for the federal city in L’Enfant’s own hand to survive into the twenty-first century rests in a refrigerated chamber in the Geography and Map Division of the Library of Congress, where it is off limits to the public because of its brittle condition and the extreme fading of its pencil lines” (Grand Avenues, pages 185-186).

In addition to the places which specifically honor L’Enfant, you could walk in L’Enfant’s footsteps by visiting Mount Vernon (where L’Enfant met with George Washington to talk about his city plans) and Georgetown (where L’Enfant stayed while exploring the land that would become Washington, D.C.).

If you are interested in seeing the artwork of L’Enfant’s contemporaries, who were also gifted artists, consider a visit to the National Gallery of Art, looking for the works of Jacques-Louis David and John Trumbull.

We hope you have enjoyed learning about Pierre Charles L’Enfant, and creating and exploring on your own!

If you love learning and creating, consider subscribing to our email updates. Simply click here to subscribe. At sparklesandsprinkles.blog, we post learning ideas and recipes, and have a penchant for all things French.

Bonne journée! Have a great day!

Note:  Some links on this page are Amazon Affiliate links.  Sparkles and Sprinkles is a participant in the Amazon Associates Program, an affiliate advertising program designed to provide a means for sites to earn advertising fees by advertising and linking to Amazon.com.

Other links may or may not be affiliate links.  We provide links because we have found these products or services beneficial, and we think you might too.

Pumpkin Chocolate Chip Muffins {gluten-free, low-sugar}

Pumpkin Chocolate Chip Muffins {gluten-free, low-sugar}

gluten free pumpkin muffins

Enjoy these healthy gluten-free pumpkin muffins with a cup of tea or coffee for a treat on a cozy fall day!

pumpkin muffins gluten-free
gluten-free pumpkin muffins

For this recipe, we simply modified our healthy gluten-free cupcake recipe.  If you would like the kid-friendly, visual instructions, follow our cupcake recipe, with these modifications:

  • reduce Greek yogurt from 2 to 1.5 cups
  • use 4 Tbsp. maple syrup
  • add 1 cup canned pumpkin puree
  • add 1 Tbsp. pumpkin pie spice
  • add 1 tsp. ground cinnamon
  • add 1 cup dark chocolate chips or mini chocolate chips

P.S. We love light buckwheat flour for gluten-free baking. Light buckwheat does not have the strong taste of regular buckwheat, and it has a nice light color. We order our light buckwheat directly through Bouchard Family Farms (with a quantity discount), but if you would like to try just one bag, it is also available on Amazon

Enjoy!

Love gluten-free baking? Subscribe to find out when we post new recipes.

Welcome to sparklesandsprinkles.blog!

Note:  Some links on this page are Amazon Affiliate links.  Sparkles and Sprinkles is a participant in the Amazon Associates Program, an affiliate advertising program designed to provide a means for sites to earn advertising fees by advertising and linking to Amazon.com.

Other links may or may not be affiliate links.  We provide links because we have found these products or services beneficial, and we think you might too.

Paleo Donuts {baked, gluten-free}

Paleo Donuts {baked, gluten-free}

On a recent trip to Nashville, we had the opportunity to go to Five Daughters Bakery. What a treat! They have delicious paleo donuts that we all sat down to enjoy one sunny afternoon… and perhaps the best part is that everyone was happy afterward (rather than the cranky behavior effect of regular donuts). We love the sweet theme of love and family at Five Daughters Bakery, so we had to snap a picture of the donut box…

5 daughters bakery box

Nashville is way too far away for us to be able to get these delicious donuts again any time soon (though a 10 hour drive might almost be worth it!), so upon arriving home, we experimented with recreating these delicious donuts. Our daughters (who are quite the food critics) actually said they think our homemade donuts are even better… Mama thinks the Five Daughters Bakery donuts are the winner, but then again, for a mama, it’s quite a treat to be able to find a healthy gluten-free snack for everyone without having to make it.

In this post, we share with you our recipes for chocolate chip donuts with chocolate ganache, and fresh raspberry donuts with creamy frosting.

* Plus – scroll down for a fall favorite we just added – apple cinnamon donuts *

The donuts can be made strictly paleo, using coconut oil, or the version our children like best, with butter.

paleo donut recipe

Ingredients for 12 donuts (for complete instructions, please scroll down):

1 1/2 cups almond flour

1/3 cup coconut flour

3/4 teaspoon baking soda

3 Tablespoons tapioca flour

3 eggs

1 1/2 teaspoons apple cider vinegar

1/3 cup melted butter (or melted coconut oil)

1 1/2 teaspoons vanilla extract

1/3 cup maple syrup

1/3 cup milk of choice

1/3 cup mini chocolate chips or fresh raspberries

Frosting/topping of choice

If you are looking for a donut pan, we recommend this one from Nordic Ware:

Let’s make donuts!

Step 1: Measure dry ingredients into a large mixing bowl.

1 1/2 cups almond flour

1/3 cup coconut flour

3/4 teaspoon baking soda

3 Tablespoons tapioca flour

Step 2: Stir dry ingredients together well.

Step 3: Measure liquid ingredients into a separate large mixing bowl.

3 eggs

1 1/2 teaspoons apple cider vinegar

1/3 cup melted butter (or melted coconut oil)

1 1/2 tsp vanilla extract

1/3 cup maple syrup

1/3 cup milk of choice

Step 4: Whisk liquid ingredients together well.

Step 5: Pour liquid ingredients into dry ingredients and stir together well.

Step 6: Add mini chocolate chips or fresh raspberries.

1/3 cup mini chocolate chips

or

1/3 cup washed fresh raspberries

Step 7: Grease donut pan and generously pipe in donut batter.

Cut about a 1 inch opening at the tip of the piping bag prior to filling the bag with batter.

This recipe makes 12 donuts. 

Need a donut pan? We love this one from Nordic Ware.

Step 8: Bake in 350 degree oven for 13-15 minutes.

We have found 13 minutes is enough. Try not to overbake.

Step 9: Let cool slightly in pan, then transfer to cooling rack.

Step 10: Top with chocolate ganache or raspberry cream

Once donuts are completely cooled, top them with chocolate ganache or raspberry cream. This is optional, the donuts are great even without topping.  (See instructions below.)

Chocolate Ganache

For the chocolate ganache in the photo, we made a super simple microwave version using just dark chocolate, butter and stevia. Simply place a dark chocolate bar in a microwave safe bowl. Melt chocolate in microwave (about 1 minute and 30 seconds). Add a few Tablespoons butter (or coconut oil), and stir with warm chocolate until well combined. Stir in sweetener to taste. Dip the top of donut into the ganache, then lift up the donut and place on a plate. Beautiful and so fun!

Raspberry Cream frosting

For the raspberry cream frosting in the photos, we used coconut cream. Refrigerate a can of coconut cream over night (make sure it is cream, not milk). Pour off the liquid and discard it. Place the cream (should be solid) in the bowl of an electric mixer. Whip until fluffy.  Add sweetener to taste (such as stevia or honey). Add a small amount of fresh raspberries. Whip again until well incorporated. Use a piping bag to frost the donuts. You could also use whipped cream instead of coconut cream, or use our low sugar butter cream cheese frosting.

Try a fall favorite – Apple Cinnamon Donuts!

Add 1 teaspoon ground cinnamon and 1/3 cup applesauce to the plain donut batter. Once donuts are baked and cooled, dip the tops in a mixture of ground cinnamon and stevia powder. This makes a yummy apple donut, like you might find at an apple orchard or fall festival, but our version is gluten-free.

ENJOY!

Find out when we post new recipes and craft ideas… simply click to here to SUBSCRIBE.

Thank you for joining us at sparklesandsprinkles.blog !

Note: Sparkles and Sprinkles is not affiliated with Five Daughters Bakery. Our four daughters are big fans of Five Daughters Bakery, though, so we tried to create some similar donuts at home.

Note:  Some links on this page are Amazon Affiliate links.  Sparkles and Sprinkles is a participant in the Amazon Associates Program, an affiliate advertising program designed to provide a means for sites to earn advertising fees by advertising and linking to Amazon.com.

Other links may or may not be affiliate links.  We provide links because we have found these products or services beneficial, and we think you might too.