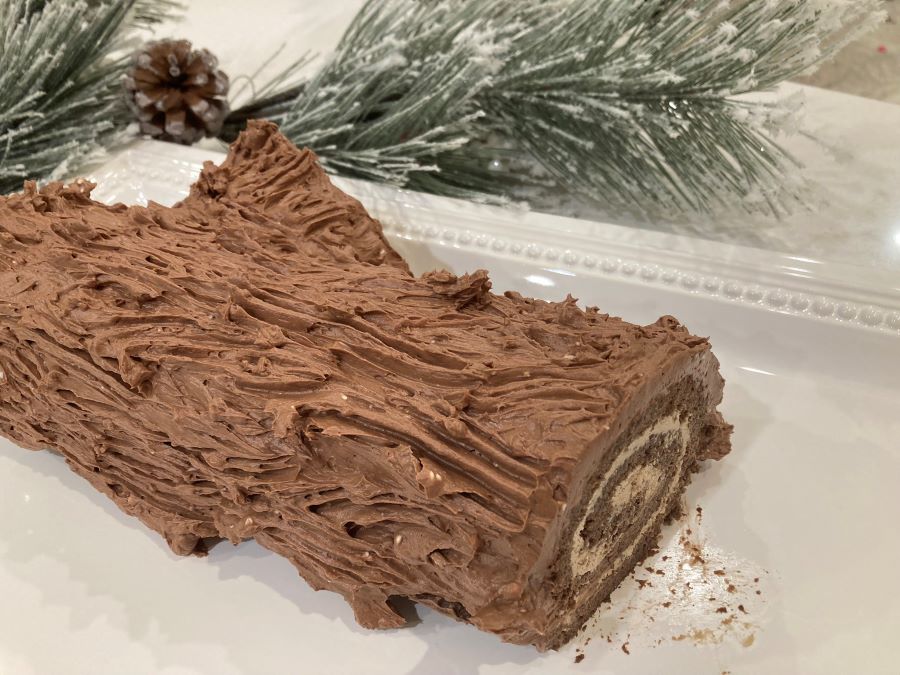
Make a city plan like L’Enfant

Make a city plan like L’Enfant

Have you ever thought about the fact that someone had to design and plan the cities where we live? In this post, we share with you a little history of the designer of our nation’s capital, Washington, D.C. His name? Pierre Charles L’Enfant.

pierre l'enfant statue in u.s. capitol building

We wish we could have found a great picture book for children to learn about L’Enfant (like the one we found about Jean-Jacques Audubon), but as we could not find one, this post is full of pictures and little snippets that tell the story of the intriguing life of Pierre Charles L’Enfant, a Frenchman with a great love of America.

After learning a little about L’Enfant, we’ll show you a fun art project to plan your own imaginary city, using L’Enfant’s methods. You can even learn some French city words, with our free chart, as a nod to L’Enfant’s native language.

And, if you are up for an adventure, we suggest some places in the D.C. area you can visit which honor the designer of our nation’s capital – scroll to the bottom of this post to find these fun places.

scott berg grand avenues

A few little notes… This post was inspired by reading Grand Avenues by Scott W. Berg – it’s a history book, but it is written like an enthralling novel. I would recommend it to adults reading this post, especially those with a penchant for French and a love for Washington D.C. For children, or those wanting a quick snapshot, our post should be a nice place to start. Pictures in this post are mostly public domain images. In many cases, clicking on the images will lead to the source of the photos if you want to dive deeper. Okay, let’s learn about L’Enfant…

Who was Pierre Charles L’Enfant?

pierre charles l'enfant

Major Peter Charles L’Enfant, redrawn from woodcut (Library of Congress)

Pierre L’Enfant was born in France in 1754.  His father was employed by King Louis XV as a royal artist. Pierre L’Enfant studied at the Royal Academy of Painting and Sculpture.  One of his contemporaries was Jacques-Louis David, who became a famous artist.

academie royale de peinture et sculpture

Vue perspective du Sallon de l’Académie Royale de Peinture et de Sculpture au Louvre (1778)

l'enfant painting

Painting by L’Enfant of West Point, 1782 (Museum of the American Revolution)

Pierre L’Enfant’s family was close with the famous playwright Beaumarchais (author of plays such as The Barber of Seville and The Marriage of Figaro). Beaumarchais encouraged a group of young men at the time to travel to America to help to fight against the English in the American Revolution. L’Enfant did not have military training, but he wanted to come to America to join in the fight for American independence.

Soon after his arrival in America, L’Enfant met George Washington. George Washington was impressed with L’Enfant, especially with his artistic abilities.  L’Enfant was asked to draw a military manual for General Baron von Steuben. L’Enfant was also asked to create the medallions for the Society of the Cincinnati. Later, L’Enfant took on a bigger project, redesigning Federal Hall in New York City.

stueben manual l'enfant

L’Enfant’s drawing for Steuben’s military manual (Muesuem of the American Revolution)

When the Revolutionary War had been won and it was decided that the new country should also have a new capital city, L’Enfant was determined to be the designer of this great city. George Washington thought that L’Enfant was the one who had the genius for this job.

“Since my first knowledge of [L’Enfant’s] abilities in the line of his profession, I have received him not only as a scientific man, but one who added considerable taste to his professional knowledge; and that, for such employment as he is now engaged in, for projecting public works, and carrying them into effect, he was better qualified than any one who had come within my knowledge in this country, or indeed in any other…”

(Letter from George Washington to David Stuart, as quoted in Grand Avenues, pages 136-137)

L’Enfant explored and surveyed the land that would become Washington, District of Columbia. Then L’Enfant meticulously designed a grand city to be built there. At the time, Georgetown was a little village and most of the area that would become Washington D.C. was farmland and forest.

washington d.c. farmland

Unknown author – Library of Congress Geography and Map Division

From his tireless study of the land, his vast imagination, and artistic talent, L’Enfant created a plan for the new capital city. He created his plan on 2 pieces of handmade paper (joined together to be 2 feet by 3 feet), using pencil and watercolor for the images, and many styles of calligraphy for the descriptions.

enfant plan for dc

L’Enfants hand drawn plan for Washington, D.C. (public domain image)

L’Enfant had a fiery personality, however, and sometimes offended the other people working in government at the time. Interestingly, the plan that became engraved and publicized had the name of one of L’Enfant’s helpers, Ellicott, who had copied and slightly modified L’Enfant’s plan. L’Enfant was enraged that after all of his hard work, his name was not the one on the published plan. Due to disagreements and financial difficulties, the plan for D.C. was slow to become a reality.

About 100 years went by without much progress on the grand plans for Washington, D.C., then L’Enfant’s original plans were unearthed by Frederick Olmsted, Jr., a highly acclaimed architect.  The McMillan Commission then attempted to more fully understand L’Enfant’s plans. The commissioners even traveled to Paris to see where L’Enfant grew up and what might have inspired his plans.

Finally, L’Enfant’s plans for a grand city for our nation’s capital began to be realized.

mcmillan plan

The McMillan Plan for the National Mall

Perhaps it is because of L’Enfant’s original plans and the McMillan Commission’s work in carrying out his plans that Paris and Washington D.C. have some similarities, among them, grand diagonal avenues, long grassy esplanades, French Second Empire and Beaux-Arts style buildings, and ornate bridges. Let’s take a look…

paris map

Map of Paris in 1774

enfant plan for dc

L'Enfant's plan for Washington, D.C.

Paris - Champ de Mars

D.C. - The National Mall

Paris - Opéra Garnier

D.C. - Eisenhower Executive Office Building

Paris - Pont Alexandre III

D.C. - Arlington Memorial Bridge

Photo by Tim Evanson from Washington, D.C., United States of America

Ready to plan your own city?

L’Enfant used large pieces of handmade paper for his plan. For your plan, you will need large pieces of watercolor paper, watercolors, paint brushes, and pencils and/or pens.


L’Enfant spent a great deal of time exploring the land on which he planned our nation’s capital, deciding, for example, what buildings would look best on hills and what areas should be near water. To add even more fun to your imaginary city plan, it could be fun to spend time wandering in a country or farm area, and imagine how that piece of land could be turned into a city or town.

Once you have some ideas, start to sketch them out on your paper with pencil. Label your map in pen or pencil and add some watercolor (perhaps blue for rivers, green for parks, etc.). You could also add explanations about your map, using pen or pencil, or even try calligraphy as L’Enfant did. Decide on a name for your city, and give your map a fancy title.

If you are interested in learning French while making the city, feel free to print a copy of our French City Word Chart. Though L’Enfant made his map with English labels, it could be fun to label your map in French, L’Enfant’s native language.

If you need help with pronunciation of these city words, you could try Narakeet. Simply select French as the language, type the French word, and listen to the pronunciation.


French city words

Ready for a L’Enfant in D.C. fieldtrip?

L’Enfant was at first not honored for his great work in designing our nations capital, but now we can find a number of places around Washington, D.C. that remind us of L’Enfant’s contribution to our country. Let’s explore…

L'Enfant Plaza

L'Enfant Plaza with metro and train stops

l'enfant statue u.s. capitol

Statue of L'Enfant in the United States Capitol Building

The statue of L’Enfant in the Capitol is quite new, installed in 2022. Watch a video of the instatlation. The statue is tucked in a quiet alcove… a big thank you to our wonderful tour guide who took the time to show us this statue, though it was not part of the standard Capitol tour.

L'Enfant's tomb in Arlington National Cemetery

L’Enfant’s remains were transferred to Arlington National Cemetery about a century after his death. His tomb overlooks the capital city he designed.

Freedom Plaza in D.C.

At Freedom plaza one can walk on a stone inlay that depicts a portion of L’Enfant’s plan for Washington, D.C. (photo from wikimedia)

Is it possible to see the original plan created by L’Enfant? Unfortunately not. We read in Grand Avenues that “The only known copy of a plan for the federal city in L’Enfant’s own hand to survive into the twenty-first century rests in a refrigerated chamber in the Geography and Map Division of the Library of Congress, where it is off limits to the public because of its brittle condition and the extreme fading of its pencil lines” (Grand Avenues, pages 185-186).

In addition to the places which specifically honor L’Enfant, you could walk in L’Enfant’s footsteps by visiting Mount Vernon (where L’Enfant met with George Washington to talk about his city plans) and Georgetown (where L’Enfant stayed while exploring the land that would become Washington, D.C.).

If you are interested in seeing the artwork of L’Enfant’s contemporaries, who were also gifted artists, consider a visit to the National Gallery of Art, looking for the works of Jacques-Louis David and John Trumbull.

We hope you have enjoyed learning about Pierre Charles L’Enfant, and creating and exploring on your own!

If you love learning and creating, consider subscribing to our email updates. Simply click here to subscribe. At sparklesandsprinkles.blog, we post learning ideas and recipes, and have a penchant for all things French.

Bonne journée! Have a great day!

Note:  Some links on this page are Amazon Affiliate links.  Sparkles and Sprinkles is a participant in the Amazon Associates Program, an affiliate advertising program designed to provide a means for sites to earn advertising fees by advertising and linking to Amazon.com.

Other links may or may not be affiliate links.  We provide links because we have found these products or services beneficial, and we think you might too.

Pumpkin Chocolate Chip Muffins {gluten-free, low-sugar}

Pumpkin Chocolate Chip Muffins {gluten-free, low-sugar}

gluten free pumpkin muffins

Enjoy these healthy gluten-free pumpkin muffins with a cup of tea or coffee for a treat on a cozy fall day!

pumpkin muffins gluten-free
gluten-free pumpkin muffins

For this recipe, we simply modified our healthy gluten-free cupcake recipe.  If you would like the kid-friendly, visual instructions, follow our cupcake recipe, with these modifications:

  • reduce Greek yogurt from 2 to 1.5 cups
  • use 4 Tbsp. maple syrup
  • add 1 cup canned pumpkin puree
  • add 1 Tbsp. pumpkin pie spice
  • add 1 tsp. ground cinnamon
  • add 1 cup dark chocolate chips or mini chocolate chips

P.S. We love light buckwheat flour for gluten-free baking. Light buckwheat does not have the strong taste of regular buckwheat, and it has a nice light color. We order our light buckwheat directly through Bouchard Family Farms (with a quantity discount), but if you would like to try just one bag, it is also available on Amazon

Enjoy!

Love gluten-free baking? Subscribe to find out when we post new recipes.

Welcome to sparklesandsprinkles.blog!

Note:  Some links on this page are Amazon Affiliate links.  Sparkles and Sprinkles is a participant in the Amazon Associates Program, an affiliate advertising program designed to provide a means for sites to earn advertising fees by advertising and linking to Amazon.com.

Other links may or may not be affiliate links.  We provide links because we have found these products or services beneficial, and we think you might too.

Paleo Donuts {baked, gluten-free}

Paleo Donuts {baked, gluten-free}

On a recent trip to Nashville, we had the opportunity to go to Five Daughters Bakery. What a treat! They have delicious paleo donuts that we all sat down to enjoy one sunny afternoon… and perhaps the best part is that everyone was happy afterward (rather than the cranky behavior effect of regular donuts). We love the sweet theme of love and family at Five Daughters Bakery, so we had to snap a picture of the donut box…

5 daughters bakery box

Nashville is way too far away for us to be able to get these delicious donuts again any time soon (though a 10 hour drive might almost be worth it!), so upon arriving home, we experimented with recreating these delicious donuts. Our daughters (who are quite the food critics) actually said they think our homemade donuts are even better… Mama thinks the Five Daughters Bakery donuts are the winner, but then again, for a mama, it’s quite a treat to be able to find a healthy gluten-free snack for everyone without having to make it.

In this post, we share with you our recipes for chocolate chip donuts with chocolate ganache, and fresh raspberry donuts with creamy frosting.

* Plus – scroll down for a fall favorite we just added – apple cinnamon donuts *

The donuts can be made strictly paleo, using coconut oil, or the version our children like best, with butter.

paleo donut recipe

Ingredients for 12 donuts (for complete instructions, please scroll down):

1 1/2 cups almond flour

1/3 cup coconut flour

3/4 teaspoon baking soda

3 Tablespoons tapioca flour

3 eggs

1 1/2 teaspoons apple cider vinegar

1/3 cup melted butter (or melted coconut oil)

1 1/2 teaspoons vanilla extract

1/3 cup maple syrup

1/3 cup milk of choice

1/3 cup mini chocolate chips or fresh raspberries

Frosting/topping of choice

If you are looking for a donut pan, we recommend this one from Nordic Ware:

Let’s make donuts!

Step 1: Measure dry ingredients into a large mixing bowl.

1 1/2 cups almond flour

1/3 cup coconut flour

3/4 teaspoon baking soda

3 Tablespoons tapioca flour

Step 2: Stir dry ingredients together well.

Step 3: Measure liquid ingredients into a separate large mixing bowl.

3 eggs

1 1/2 teaspoons apple cider vinegar

1/3 cup melted butter (or melted coconut oil)

1 1/2 tsp vanilla extract

1/3 cup maple syrup

1/3 cup milk of choice

Step 4: Whisk liquid ingredients together well.

Step 5: Pour liquid ingredients into dry ingredients and stir together well.

Step 6: Add mini chocolate chips or fresh raspberries.

1/3 cup mini chocolate chips

or

1/3 cup washed fresh raspberries

Step 7: Grease donut pan and generously pipe in donut batter.

Cut about a 1 inch opening at the tip of the piping bag prior to filling the bag with batter.

This recipe makes 12 donuts. 

Need a donut pan? We love this one from Nordic Ware.

Step 8: Bake in 350 degree oven for 13-15 minutes.

We have found 13 minutes is enough. Try not to overbake.

Step 9: Let cool slightly in pan, then transfer to cooling rack.

Step 10: Top with chocolate ganache or raspberry cream

Once donuts are completely cooled, top them with chocolate ganache or raspberry cream. This is optional, the donuts are great even without topping.  (See instructions below.)

Chocolate Ganache

For the chocolate ganache in the photo, we made a super simple microwave version using just dark chocolate, butter and stevia. Simply place a dark chocolate bar in a microwave safe bowl. Melt chocolate in microwave (about 1 minute and 30 seconds). Add a few Tablespoons butter (or coconut oil), and stir with warm chocolate until well combined. Stir in sweetener to taste. Dip the top of donut into the ganache, then lift up the donut and place on a plate. Beautiful and so fun!

Raspberry Cream frosting

For the raspberry cream frosting in the photos, we used coconut cream. Refrigerate a can of coconut cream over night (make sure it is cream, not milk). Pour off the liquid and discard it. Place the cream (should be solid) in the bowl of an electric mixer. Whip until fluffy.  Add sweetener to taste (such as stevia or honey). Add a small amount of fresh raspberries. Whip again until well incorporated. Use a piping bag to frost the donuts. You could also use whipped cream instead of coconut cream, or use our low sugar butter cream cheese frosting.

Try a fall favorite – Apple Cinnamon Donuts!

Add 1 teaspoon ground cinnamon and 1/3 cup applesauce to the plain donut batter. Once donuts are baked and cooled, dip the tops in a mixture of ground cinnamon and stevia powder. This makes a yummy apple donut, like you might find at an apple orchard or fall festival, but our version is gluten-free.

ENJOY!

Find out when we post new recipes and craft ideas… simply click to here to SUBSCRIBE.

Thank you for joining us at sparklesandsprinkles.blog !

Note: Sparkles and Sprinkles is not affiliated with Five Daughters Bakery. Our four daughters are big fans of Five Daughters Bakery, though, so we tried to create some similar donuts at home.

Note:  Some links on this page are Amazon Affiliate links.  Sparkles and Sprinkles is a participant in the Amazon Associates Program, an affiliate advertising program designed to provide a means for sites to earn advertising fees by advertising and linking to Amazon.com.

Other links may or may not be affiliate links.  We provide links because we have found these products or services beneficial, and we think you might too.

Doll and Me flutter sleeve pillowcase dresses

Doll and Me flutter sleeve pillowcase dresses

Learn to make matching flutter sleeve dresses for a child and her doll!

Our free pattern and step by step tutorial can help even the beginner to make these dresses (this can also be a very quick project for those with sewing experience). These dresses can be sewn entirely by hand. Our tutorial gives directions for hand-sewing stitches (with video tutorials on each stitch!), but if you are using a machine, a straight stitch can be used. Pillowcase dresses can also be used as nightgowns.

doll and me dress
doll and me dress
doll and me dress

Why pillowcase dresses?

Starting with pillowcases allows some of the major seams to be completed without any work. This makes sewing a dress for a beginner a much easier and faster project.

Some tips for selecting the pillowcases:

1.  We recommend using standard size cotton pillowcases. Standard size tends to be 20″ by 30″ or 32″. If you would like a longer dress, you could consider adding some extra fabric or wide lace to the bottom when you finish the dress. If you would like to select a king size pillowcase (typically 36″ long), just check that it is 20″ wide. Sometimes king size pillowcases are narrower than standard size pillowcases. If the pillowcase is narrower than 20″, the dress may be too narrow to wear comfortably. 

2.  If picking a pillowcase with a  patterned fabric, be sure the pattern will be in the right direction for the dress. An overall pattern that does not have a clear horizontal or vertical direction might work best. The pillowcase as a dress will hang down vertically (rather than the horizontal direction as used on a bed).

3.  Make sure the pillowcase you select is a woven cotton (not a stretchy jersey knit). The pillowcases we used in the photos and videos for this tutorial were from Laura Ashley (200 thread count breathable percale cotton pillowcase set) and Threshold (400 thread count performance pillowcase set).

Our tutorial begins with instructions for making the doll dress. The dress is designed for an 18″ doll (such as an American Girl or Our Generation doll), but the pattern can work for other dolls as well.

Starting with the doll dress will allow the beginning seamstress to practice and perfect her stitches before attempting child-size clothing.

Stitches will need to be stronger and smaller for child-size clothing that will likely be washed and worn more often.

doll and me dresses

Ready to make some really sweet dresses?  Let’s get started…

We recommend reading through the entire tutorial before beginning the project.

Gather your supplies…

Note: We have just updated this post (August 2024) with Amazon links for supplies. It is not necessary to use these exact products, but we have added the links to help you to gather the supplies more easily. Happy sewing!

Let’s make a doll dress!

Step 1

Wash and dry your pillowcases. Iron the pillowcases well to remove wrinkles. Use only one pillowcase for all steps in this section. (Set one pillowcase aside to be used later for the child-size dress.)

doll and me dress pattern

Step 2

Print out the pattern pieces, then cut them using craft scissors. Do not use sewing scissors to cut printer paper, as doing this will dull your sewing scissors.

Step 3

Cut off the short side of one pillowcase opposite the opening. VERY IMPORTANT: Do not cut the side where the pillow would normally be inserted – this part will become the pre-finished hem of the dress.

doll dress pattern layout

Step 4

Fold the pillowcase so that the pattern pieces needing to be placed on a fold will be on a fold (not on the seams of the pillowcase). Place all pieces (doll dress, doll sleeve, and child sleeve) on the fold and make sure none overlap the seam (if so, refold fabric to have more room). Watch this video if you need help.

Step 5

Pin on the doll dress pattern pieces. If you are also planning to make a girl size dress, you should also pin on the child size dress sleeve pattern. New to pinning patterns? Watch this video. Carefully cut out the pieces. Remove the pins, and set the fabric aside.

Step 6

As each piece needs to be cut twice, flip the pillowcase over, fold the pillowcase again so that the pattern pieces can be placed on a fold (not on a seam). Pin on pattern pieces and carefully cut out the pieces. Remove the pins. Set aside both child size sleeves to be used later.

Step 7

Place the doll dress fabric right sides together and line up the edges. What does right sides together mean? Click here to watch our quick video.

Step 8

Pin the sides of the dress. How to place the pins? Check out this quick video.

Step 9

Draw a light pencil line 1/4″ from the edge of the left and right sides of the dress before you start stitching to keep your stitches straight.

Step 10

Using a backstitch sew a seam 1/4″ from the edge on the left and right sides of the dress. The back stitch allows the dress to hold together better than a simple running stitch would (however, a very young child or a beginner might want to just use a running stitch). Would you like to learn the back stitch? Watch this quick video.

Step 11

Find the doll sleeve pieces. With the help of an iron and a sewing gauge, iron the curved edge of each sleeve under 1/4″. Do not worry if it is not exactly 1/4″ inch, as the curve will make this challenging. (Children may want to ask an adult for help with the iron.) Watch this video for tips on ironing to a measurement.

Step 12

Using a running stitch, sew a seam about 1/8″ from the curved edge of the sleeve. What is a running stitch? Watch our video.

Step 13

Pin each sleeve to the dress as shown, right sides together. You may want to pin one part of the sleeve at a time, sew it, then pin another side. Watch this video to learn how to pin on sleeves.

Step 14

Using a backstitch, sew the sleeves onto the dress bodice, 1/4″ from the edge of the fabric.

Step 15

Press open the dress side seams and press the underside of the armhole opening down 1/4″.

Step 16

Using a running stitch, stitch the underside of the armhole opening about 1/8″ from the edge.

Step 17

Fold the seam allowances at the neckline/sleeve connections so that they all face the same direction (e.g. clockwise). Then use a basting stitch to keep them down (a basting stitch is like a running stitch, but you do not need to knot the thread, and you can pull out this stitch later). See this video for help. Baste the seam allowances from the neckline and down about 3/4″. Basting down the seam allowances in the same direction will make threading the elastic in step 20 easier.

Step 18

With the help of an iron and a sewing gauge, fold the neckline of the dress over 1/2″. Do not worry if it is not exactly 1/2″ inch, as the curve will make this challenging. However, a little more than a 1/2″ is better than a little less. (Children may want to ask an adult for help with the iron.) Pin down the fold to keep it in place.


Step 19

Using a running stitch, stich around the neckline, about 1/4″ from the edge. The fabric will wrinkle where it connects at the sleeves (this is okay). You can remove the pins as you sew. Leave a 1″ opening between where you start and stop your stitches. This creates a casing for the elastic. Leaving the 1″ opening is essential to be able to insert the elastic.

Step 20

Cut a 12″ piece of 1/8″ wide elastic. Attach a small safety pin to one end of the elastic. Thread the elastic through the casing, being sure to hold on to the other end of the elastic so that it does not get pulled all the way through. Once the safety pin makes its way all the way around the neckline, pull the elastic so that the end of the elastic comes out of the casing by a couple inches. Put the two ends of the elastic together and make a sewing knot. Watch our video for help with this step.

Step 21

Flip the dress right side out. Put the dress on your doll. Adjust the location of the knot on the elastic so that the neckline is right for your doll. Take the dress off of the doll, cut off any extra elastic from the neckline. Use a running stitch to stitch together the 1″ opening.

flutter sleeve doll dress

Step 22

Congratulations!  You just made a new dress for your doll!  If you would like, tie a piece of grosgrain ribbon around the waist line.

Have fun playing together!

Please note, as this is a hand-sewn project, it should be treated gently.


Let’s make a girl-size dress to match!

Step 1

If you have already made the doll dress, find the girl-size sleeve pieces that have been cut out of one of the pillowcases in steps 5-6.

If you did not make the doll dress first, follow the beginning steps for the doll dress (wash, dry, and iron pillowcases; print and cut out paper pattern pieces). Follow steps 3 to 6 of the doll dress instructions to cut out only the girl-size dress sleeves.

Step 2

Measure from the back of the neck down to the desired length of the dress (for example, to the knee or calf). Write down this measurement to save for another step.

Step 3

Lay the pillowcase on the cutting board. Place the opening (hemmed side – where the pillow would be inserted) of the pillowcase on the zero line of the cutting board.

Step 4

Cut off the top of the pillowcase (the part that is sewn shut on the opposite side from the pillow opening) so that your pillowcase becomes your desired length. Use your measurement from step 2 (in the example here, we wanted our dress to be 25 inches long from neck to knee). Or if you want to keep the full length of the pillowcase, simply cut off the smallest possible amount. To keep your cut straight, you may want to draw a line. Your pillowcase will now be open on two ends. The part you cut off will become the neckline. Very important: Do not cut the hemmed opening of the pillow case – the hemmed opening will become the bottom hem of the dress!

Step 5

Find the armhole template. (Choose size small/medium for sizes 4 to 9, and large/xl for sizes 10 to 14). Pin the template at the top left of the pillowcase as shown (with the curved side toward the center). Cut out the armhole. Discard the cutout fabric. 

Step 6

Repeat step 5 on the right side of the dress, but place the template face down (so that the curved side is again toward the center).

Step 7

Find the sleeve pieces.  If desired, use pinking shears to cut near the edge of the curved part of the sleeves (this may help to keep the fabric from unraveling when washed, but is optional). With the help of an iron and a sewing gauge, iron the curved edge of each sleeve under 1/4″. Do not worry if it is not exactly 1/4″ inch, as the curve will make this challenging. (Children may want to ask an adult for help with the iron.)

Step 8

Using a running stitch, sew a seam about 1/8″ from the curved edge of each sleeve. What is a running stitch? Watch our video.

Step 9

Flip the pillowcase inside out. Pin each sleeve to armholes of the dress as shown, right sides together. Sleeves need to be pinned on to each side of the dress, but only one side is shown here. Watch this video of pinning the doll dress sleeves for help.

Step 10

Using a backstitch, sew the sleeves onto the armholes of the dress bodice, 1/4″ from the edge of the fabric. Sleeves need to be sewn on to both sides of the dress, but only one side is shown here.

Step 11

Make a rolled-hem on the underside of each armhole by folding over the fabric twice by about 1/8″. Pin parallel to the edge of the fabric to keep in place. A rolled hem will keep the raw edge from showing under the arm.

Step 12

Make a running stitch very close to the edge of the underside of each armhole opening. 

Step 13

Fold the seam allowances at the neckline/sleeve connections so that they all face the same direction. Then use a basting stitch to keep them down (a basting stitch is like a running stitch, but you do not need to knot the thread, and you can pull out this stitch later). Baste from the neckline of the dress and down about 1 inch. This basting stitch will make threading the elastic in step 16 easier. Watch this quick video for help (it shows the doll dress, but has the same idea).

Step 14

With the help of an iron and a sewing gauge, fold the neckline of the dress over 1/8″ and press.  Then fold over another 1/2″. Do not worry if it is not exactly 1/2″ inch, as the curve will make this challenging. However, a little more than a 1/2″ is better than a little less. Note:  This step is slightly different than in the doll dress – folding over the fabric twice will make it so that the raw edge of the fabric will not been seen, and will be less likely to fray when washed. This double fold is more complicated than a single fold, but is important as the garment will be worn by a child, rather than a doll.

Step 15

Using a running stitch, stich around the neckline, as close to the lower folded edge as possible (to be sure that the 1/8″ fold gets stitched down). Leave a 1″ opening between the start of your stitching and your last stitch. This creates a casing for the elastic. Leaving the 1″ opening is essential to be able to insert the elastic.

Step 16

Cut a 30″ piece of 1/8″ wide elastic. Attach a safety pin to one end of the elastic. Thread the elastic through the casing, being sure to hold on to the other end of the elastic so that it does not get pulled all the way through. Once the safety pin makes its way all the way around the neckline, pull the elastic so that the end of the elastic comes out of the casing by a couple inches. Put the two ends of the elastic together and make a sewing knot. Watch our video for help with this step. This video shows the doll dress, but the same concept is used for the child size dress.

Step 17

Flip the dress right side out. Try on the dress. Adjust the location of the knot on the elastic so that the neckline is right for the child. Take the dress off, cut off any extra elastic from the neckline. Use a running stitch to stitch together the 1″ opening.

Congratulations! You just made a new dress!


Step 18 - optional

If you would like to define the waistline of the dress, grosgrain ribbon could be tied around the waist. Making a simple 1″ long stitch on each side of the dress at the waistline will help to keep the ribbon in place.

Another option to define the waist would be to create a casing with an extra piece of fabric, sew this at the waistline, and insert elastic.


Ready to get the pattern? Click here.

Looking for more fun doll ideas?

American Girl Doll Party Ideas

Host a doll party!

baby doll with knit hat

Knit a hat for your doll!

If you would like to know when we post new craft or recipe ideas, simply subscribe, by clicking here: SUBSCRIBE

Welcome to sparklesandsprinkles.blog