Spring Folk Art Trees

Spring Folk Art Trees

We’ve been studying about Colonial history this year.  The cheerful and simple folk art depicting Colonial times inspired us to learn more about folk art.  

To learn about how to make folk art trees, we watched a video on Deep Space Sparkle.

This great tutorial from Deep Space Sparkle focusses on trees in the autumn, but as it is springtime, we modified the designs for spring. 

We also chose to draw the designs with colored pencil, rather than Sharpies (a little safer with little ones!).

We also found inspiration from Cheryl Bartley designs.  She has free coloring pages too!


We had so much fun on a late winter (almost spring!) afternoon, looking out at the trees, and creating folk art together.  Before creating our art we spent some time looking closely at the trees.  Only God can make so many branches and leaves, but the simplicity of folk art allows us to capture the beauty of trees in a simple and fun way. Hope your family can enjoy some art time together too! Here is a sampling of our art…

folk art spring tree

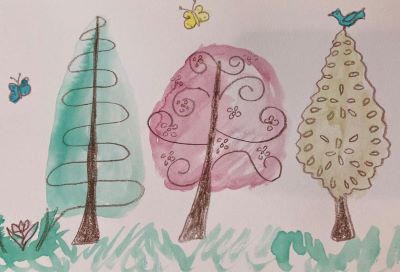
folk art trees with flower embellishments

Our 8-year-old had fun adding spring blossoms to her trees.

folk art forest

folk art trees in a forest

Our 11-year-old enjoyed making a peaceful spring forest scene.

folk art winter

folk art trees with sparkling snow

Spring often comes with surprise snowfalls.  Our 8-year-old added a sprinkling of salt over her watercolor to make her trees look like they have a glimmer of snow.

folk art tree toddler

folk art trees by our toddler

Folk art is for any age.  Our toddler had so much fun painting her trees too!

folk art trees

folk art spring tree garden

Even Mama joined in the fun of painting. Making art together brings so much peace to the day!

Looking for art supplies?

Check out the links below for art supplies we love for this project.

Enjoy!


Note:  Some links on this page are Amazon Affiliate links.  Sparkles and Sprinkles is a participant in the Amazon Associates Program, an affiliate advertising program designed to provide a means for sites to earn advertising fees by advertising and linking to Amazon.com.

Other links may or may not be affiliate links.  We provide links because we have found these products or services beneficial, and we think you might too.

Hand-sewn doll clothes

Hand-sewn doll clothes

Ready to make a cute new outfit for your doll?  It’s so easy with this beautiful pattern book by Erin Hentzel!  We found this book to be so much better than simply using a packaged pattern.  The photos are adorable, and very helpful for the young seamstress.  Even if you have not sewn before, the book gives step by step instructions for making the clothes from start to finish.  If you are an advanced seamstress, this book is still wonderful!  Each pattern shows the level of difficulty, assigning a certain number of stars to show the level.  The patterns are for 18″ dolls (American Girl-sized dolls).

erin hentzel sew your own doll clothes
American Girl Doll Clothes hand sewn

We decided to try 3 of the patterns in this book, and sew them all by hand.  Of course it would be faster to sew the clothes with a machine, but they can all be sewn by hand as well.

We chose a coordinating solid and print to make this ensemble: a purse, a top, and shorts.  The best fabric to use for these patterns is light-weight cotton quilting fabric.

To get started, watch our YouTube video for tips on cutting out the pattern (especially helpful for beginners).


Some tips for sewing your ensemble by hand…

We made a few modifications to the instructions to make the hand sewing easier.  For the purse, we trimmed off the edges of the fabric to about an 1/8″ from the seam.  This made it so that when we sewed the front and the back of the purse together, we did not have to sew through so many layers.  (We made our first purse without trimming the fabric, and we found it could be a bit difficult to sew through so many layers of fabric, especially for little hands.)

We chose to use snaps to fasten the back of the shirt together. (Click here to watch our video on sewing snaps.)The pattern book suggests Velcro; however, hand sewing through Velcro can be a bit cumbersome.  We simply folded over each side of the back of the shirt by a quarter of an inch, and made a seam.  Then we sewed on a snap set at the top, and another snap set about 2 inches from the top.  Just for fun, we embellished the back of the top with little bows too.

The modification we made for the shorts was to use 1/8″ elastic, rather than the wider elastic suggested in the book.  This allowed us to not be as concerned about keeping our stitches super close to the edge of the casing.  We used a 13″ length of 1/8″ elastic and then tied a knot about 1″ from the end to secure it, rather than sewing through the elastic.

Another helpful tip for sewing these items by hand is to use a ruler and a pencil to mark off a 1/4″ from the edge of your fabric when needed.  This will help the stitches to be straighter, especially for beginners.

Of course for the clothes to stay together well, the stitches should be small.  1/8″ or smaller in length.  We used a running stitch for all of the items we sewed; however, to make them even sturdier, a back stitch could be used.  We chose to thread our needle and sew with double thickness of thread.

We found “finger pressing” – using your finger to fold and press the fabric, rather than an iron – worked well for these patterns.  (However, ironing the whole piece of fabric before cutting out the patterns is important!)  Using finger pressing, rather than an iron makes it easier for children to work on these projects on their own without having the use a hot iron.  It is helpful in some cases (such as the hem of the shorts) to pin after finger pressing.  

We have only tried three patterns from Sew in Style: Make Your Own Doll Clothes, but we can’t wait to try more!  If you would like to find out more, or purchase the book, please click on the image.  Happy sewing!

Enjoy your new doll outfit!

Our 10-year-old had fun taking these pictures with her doll playing outside, sporting her cute new outfit…

American Girl Doll Clothes hand sewn

If you love dolls as much as we do, you might enjoy some of our other doll ideas:  knit a doll hat and doll party ideas.

american girl doll knit hat
American Girl doll party ideas

Note:  Some links on this page are Amazon Affiliate links.  Sparkles and Sprinkles is a participant in the Amazon Associates Program, an affiliate advertising program designed to provide a means for sites to earn advertising fees by advertising and linking to Amazon.com.

Other links may or may not be affiliate links.  We provide links because we have found these products or services beneficial, and we think you might too.

Beautiful Sunday Waffles {gluten-free, high protein, low-carb}

Beautiful Sunday Waffles {gluten-free, high protein, low-carb}

When we first started making these waffles, we named them “beautiful Sunday waffles” because the whole family loved them… and they were so delicioulsy filling that no one complained of being hungry all through Sunday Mass.  We were even able to come home after Mass and not feel rushed to get lunch on the table.  Hooray!

Only 3 simple ingredients are needed for these protein-packed waffles:

  • natural salted peanut butter
  • eggs
  • vanilla extract


Of course these waffles can be made any day of the week!  We find they are great on school days too.  I like to make a large batch on the weekends, and reheat them in the microwave for quick and nourishing weekday breakfasts.  Waffles can be stored in the refrigerator for a few days on a plate, covered in plastic wrap.  Waffles can also be placed in a Ziplock bag and kept in the freezer for a number of weeks.  We use 15 eggs in this recipe simply because that is the largest quantity our blender can hold.  However, the recipe could be scaled down to use 10 eggs and 1 cup of peanut butter, or 5 eggs and 1/2 cup of peanut butter.

We use peanut butter in our waffles, but salted almond butter can also work.  Be sure that the nut butter you use is natural and very drippy.  Our favorite drippy natural peanut butter is Welsley Farms Organic Peanut Butter from BJ’s.  We have not tried sunbutter, but we would love to hear in the comments below if that is something that works for those with nut allergies.

Because these waffles are naturally full of protein and low-carb, they can be topped to your delight with toppings you love!  Yogurt and berries?  Maple syrup or honey?  Whipped cream, chocolate and bananas?  What toppings do you love?  Our children love to have waffle decorating contests… stay tuned… we might just have a Sparkles and Sprinkles waffle decorating contest in the coming months!

We typically use a Belgian waffle maker or our Cuisinart griddle fitted with waffle irons.  However, we recently tried out a little waffle maker by Dash.  Our daughters think it is just too cute!  It also comes in a fun variety of colors.  If you like thinner, smaller waffles, the little Dash waffle maker is great.  A little warning if children are helping in the kitchen, though:  the handle is very small and can get hot, so use a hot pad when lifting the handle.  We also found it was helpful to use silicone tongs to remove the waffles from the maker.  If you are making waffles for a crowd, you may want to have a few of these small waffle makers to make more than one waffle at a time.

While most of our recipes on Sparkles and Sprinkles are great for children to help in the kitchen, this waffle recipe is probably best for adults and older children (due to the many eggs to crack and the hot waffle iron).  If your little ones need a fun activity for while you are making this delicious breakfast, we recommend the Learning Rescources Waffle Time play kitchen set.  Our children continue to play with this delightful set year after year.

One final note before we get started.  Though it may not be necessary, we usually butter our waffle iron before pouring the batter.  However, if the waffles do happen to stick, we find that the handle of silicone spoon can help to remove any stuck bits of waffle.  

Let’s make waffles!

Gather your ingredients:

15 eggs

1 1/2 cups natural salted creamy peanut butter (if your nut butter is unsalted, add a dash or salt to your batter)

1 tsp. vanilla extract

Butter (optional – to grease the waffle iron if needed)


Gather your kitchen supplies:

Waffle maker

Blender

Silicone spatula

1 cup measuring cup

1/2 cup measuring cup

1 teaspoon

large (4 cup) glass liquid measuring cup

plates (for finished waffles and for serving)

forks (for removing waffles from the maker, and for serving)

silicone baby spoon (optional – helpful for removing any bits of waffle that might stick to the waffle maker)

silicone tongs (optional – for removing waffles from the maker without the risk of scratching the maker)

Measure, blend, cook, and enjoy!

Step 1

Crack 15 eggs into a large glass liquid measuring cup.

Step 2

Carefully pour the eggs into the blender.  (Hold the blender jar at an angle over the sink while pouring in the eggs from the measuring cup to reduce the risk of spilling the eggs.  Then place the blender jar on the blender.)

Step 3

Measure 1 teaspoon vanilla extract.

Step 4

Pour vanilla extract into the blender jar.

Step 5

Measure 1 1/2 cups peanut butter.

Step 6

Add the peanut butter to the blender jar.

Step 7

Place cover on the blender.

Step 8

Plug in the blender.  (Wait until the cover is on to plug in the blender, to avoid any accidents.)

Step 9

Blend until all ingredients are thoroughly mixed.

Step 10

Butter the pre-heated waffle iron. (Be sure to use a long stick of butter so that your hands do not get too close to the heat.)

Step 11

Pour the batter into pre-heated waffle iron.  Be careful not to overfill the waffle space.

Step 12

Use a silicone spatula to spread the batter evenly.  Add more batter if needed.

Step 13

Close the waffle iron.  Let the waffles cook, according to your waffle iron instructions.  We find about 4 minutes works for our Belgian waffles.

Step 14

Open the waffle iron.  Waffles are cooked when lightly golden brown.

Step 15

Remove the waffles from waffle iron.  Use a fork (without touching the waffle iron) or silicone tongs.

Step 16

Place waffles on a plate.  Repeat waffle cooking steps until all batter is used.


BON APPETIT!

Note:  Some links on this page are Amazon Affiliate links.  Sparkles and Sprinkles is a participant in the Amazon Associates Program, an affiliate advertising program designed to provide a means for sites to earn advertising fees by advertising and linking to Amazon.com.

Other links may or may not be affiliate links.  We provide links because we have found these products or services beneficial, and we think you might too.

Lemonade by the glass {easy, no refined sugar, low-carb}

Lemonade by the glass {easy, no refined sugar, low-carb}

Cheers to summer!  Are you ready to enjoy a fresh glass of lemonade with no worries about too much sugar?  Follow this simple recipe for a refreshing glass of lemonade any time!

lemonade supplies

Gather your kitchen supplies

Cutting board

Knife

Juicer

Spoon

8 oz (or larger) glass and (optional) a liquid measuring cup

lemonade

Gather ingredients

1 fresh lemon (or about 3 T lemon juice)

1 individual packet of SweetLeaf (or a spoonful or honey if you prefer)

Cold water

Ice (optional)


Let’s make lemonade!

lemonade

Step 1

Wash your lemon, then carefully slice it in half.

lemonade

Step 2

Juice the lemon.

lemonade

Step 3

Open SweetLeaf packet and pour it into the bottom of your glass.

lemonade

Step 4

Pour the lemon juice into your glass.

Step 5

Add cold water to your glass (either measure about 1 cup, or fill your glass directly from your faucet).

Step 6

Stir well.  Add ice (optional).  Enjoy!

lemonade low carb

After you make one glass of lemonade, you can decide to use more or less lemon juice and more or less sweetener the next time you make it.  Simply adjust the quantities to your liking.

Some books to enjoy while you sip your lemonade…

lime tree

Lemon or lime?  Just for fun, a little story about our “lemon” tree.  This is a photo of the tree we bought last year that was labeled as a Meyer lemon tree.  We were so excited to have a lemon tree when we learned that in our climate (growing zone 7), it can thrive in a pot outside and just be brought inside for the coldest months of the year.  So far we have only had green “lemons” so we are wondering if perhaps we actually bought a mislabeled lime tree.  It is full of blossoms again this spring, so we’ll keep you posted if we can make lemonade sometime this year with some homegrown lemons.  That would be exciting!

Do you have a lemon or lime tree?  We would love to hear your advice on growing citrus trees in the comments below!  

Note:  Some links on this page are Amazon Affiliate links.  Sparkles and Sprinkles is a participant in the Amazon Associates Program, an affiliate advertising program designed to provide a means for sites to earn advertising fees by advertising and linking to Amazon.com.

Other links may or may not be affiliate links.  We provide links because we have found these products or services beneficial, and we think you might too.

ADORABLE Hatching Chick Easter Card

ADORABLE Hatching Chick Easter Card

Are you looking for a sweet way to say Happy Easter to your friends and relatives?  Come watch our easy-to-follow Youtube tutorial for this adorable card. The front of the card shows an Easter egg, and when the card is opened, there is an adorable hatching chick!

Supplies


Click on the video to find out how to make this sweet Easter card for your friends and family. Enjoy!

Do you want to learn to make Youtube videos? Our 12-year-old makes the videos for Sparkles and Sprinkles. She learned how to start a Youtube channel through a great class from Film School 4 Teens. They are a Christian family who offers a number of online film classes.

Note: Some links on this page are Amazon Affiliate links. Sparkles and Sprinkles is a participant in the Amazon Associates Program, an affiliate advertising program designed to provide a means for sites to earn advertising fees by advertising and linking to Amazon.com.

Other links may or may not be affiliate links. We provide links because we have found these products or services beneficial, and we think you might too.