Homeschool kick-off week: a joy-filled way to start the school year

Homeschool kick-off week: a joy-filled way to start the school year

Looking for a way to make the start of the school year something to look forward to? And bring happy memories for years to come? How about a homeschool kick-off week?

We’ve been doing homeschool kick-off weeks in one way or another since our oldest daughter started kindergarten. That year we went to a pick-your-own flower farm on the first day of school, as we had decided to name our homeschool Little Flowers School after Saint Thérèse. The reality was that a trip to the flower farm was a bit stressful with little ones – see the signs in the photo below: “Do not walk in the flower beds” and “Choose carefully. You are required to pay for ALL flowers you pick.” It was not the idyllic day of carefree frolicking in flower fields I envisioned, but we did come home with some pretty bouquets, and the day at the flower farm is still a happy memory. Homeschool kick-off days have gotten better from there, and in this post we share with you some examples of our homeschool kick-off days. 

While our homeschool kick-off weeks are quite different every year, there are three things they tend to have in common:

  • some surprise gifts
  • a slow start (doing just one or two subjects a day – more on that below)
  • fun family together time activities 

We usually base the especially fun days on what we plan to study for social studies or science in the coming year… this way our activities relate to everyone, as we tend to do science and social studies as a whole family.


Special Gifts

Our kick-off days start with an idea I borrowed from German teacher at the school where I used to teach. She so kindly wrapped beautiful little gifts to have on each student’s desk on the first day of school. She told me that it is a German tradition for students to be given gifts to start the school year. They are called Schultüte. Her generosity amazed me to do this for so many students! And I’m sure it brought joy to so many students over the years.

Inspired by this, we try to start off our school year with some fun gifts as well. Somehow a beautifully wrapped gift to open brings lots of smiles, even if there might be sadness in summer coming to an end. Rather than just the necessary school supplies, we try to find something special, like pretty pencils with inspirational quotes, or unique pencil cases found at gift shop over the summer. Sometimes we include books and a book journal. For children who are not officially school age, we pick gifts of toys that they might enjoy playing with while the older siblings are doing school work. One year when the big girls needed a real microscope, our little ones received an educational microscope toy.

Here is what our kick off week looked like this year… 

We’ll also share with you some of the curricula we are using this year – we are always grateful for learning about curricula other families love, so we hope our favorites might be helpful to you as well. We have a penchant for a Charlotte Mason approach to learning.

Monday: History Day 

This year we will be studying ancient history, so a brand new DK Eyewitness book about Ancient Greece was sitting by the breakfast table. These books bring history alive, and are so fun to peruse – no one needs to tell a child to pick this up and learn, it just happens!
We then read from Spend the Day in Ancient Greece, which tells the story of a fictional Ancient Greek family and gives numerous craft ideas. We made the first project in the book: an owl made out of clay to represent Athena’s wisdom.
We also started our read aloud from Famous Men of Greece (suggested in the Mater Amabilis curriculum).  The girls did narration and drawings about what they learned in their history notebooks. (History notebooks are so fun, by the way… they give each child a way to express themselves at their own level, whether it be a lengthy written description by a teen or a simple drawing by a preschooler.)
We continued the Greek theme with making Greek salad for lunch and Amygdalota (naturally gluten-free almond flour Greek cookies that symbolizes new beginnings) for dessert. 
ancient greece

Tuesday: French and Music Day

We started our day by cuddling up together and reading from a French children’s book.

The girls then opened some fun gifts – a 3D puzzle of Paris and audio flashcards (a screen-free activity that still allows independent language practice). The 3-D puzzle of Paris turned out to be a hit! It was so fun to put together, and actually provided for hours of (gentle) play in the days to come (as there are little people that can be moved around).

We also took the time to do our Hoffman Academy online piano lessons. (I was at first skeptical of the idea of online piano lessons, but we have now been using Hoffman Academy for years – it teaches not only how to play piano, but incorporates music theory as well, in a very well-thought-out and fun way.)

The highlight of our day was going to a beautiful French cafe for lunch and spending some time playing at a local park with friends. On our drive to the cafe, we listened to the Busy Kids Love Music podcast. (I’m trying to incorporate music history into our curriculum this year without adding in any prep work – this podcast is delightful.)

Wednesday: English Day

The gift for the day was a bookmark making kit and a beautiful newly published book, Because Barbara, about the life of author and illustrator, Barbara Cooney.  (We have at least one budding author and illustrator in our family, so this book was a good inspiration, and everyone loved it!)
I spent time helping each child with their grammar and spelling books. (This year, we are using Catholic Heritage Curricula  for the older girls and The Good and the Beautiful for our Kindergartner.)
The plan was also to make a visit to our local library, but we ended up opting to do this another day as everyone was tired this day. It’s good to flexible and go-with the flow for a joy-filled kick-off week.

Thursday: Math Day

I was able to do a math lesson with each child so that we could get to know the math program. This year, for the first time, our girls are all doing The Good and the Beautiful math – true to its name, it is a visually beautiful program that uses a spiral learning approach.
Our fun activity for math day was really pretty simple… a nature walk where each child gathered nature items of their choice in a little bag, then we came home and thought about how they could relate to math. How many petals are on this flower? Why do flowers have so many seeds? What shapes do you see? How far do you think we walked?…

Friday: Science Day

While we often do our biggest kick-off day on the first day, this year it worked best to do our biggest kick-off day on Friday. My husband takes the day off of work for this day to join us in the fun and add some words of encouragement and special blessing prayers for the start of the school year.
We started the day with pancakes in the shape of bears for breakfast and a gift of pencils with animal erasers… as a little foreshadowing that our special trip would be to the zoo. (Side note: We use our healthy gluten-free cupcake recipe to make the batter for our pancakes. These pancakes are packed with protein for a great start to the day.) 
A trip to the zoo was such a fun way to kick-off our study of biology this year. Below are a few of the many photos we took of the animals. To top off the day, we were able to stop in for some prayer time at church on our way home to thank God for the gift of His creation, and ask God to guide our school year too.

With such a long day at the zoo, we actually waited until the following week to start our science book work. We are using The Good and the Beautiful biology program this year, starting off with mammals. So far I am totally impressed, and the children love the program. I really love how the program has one main teacher guide, and separate (scaffolded) nature journals for each age group. They seem to be spot on for the level of work that seems appropriate for their ages. 

A Slow Start…

You may notice that we only do one or two subjects per day during our kick-off week. I call this a “slow start,” and there are so many reasons I love it:
  • Doing only one subject a day to start gives me time to work one-on-one with each child on each subject, without feeling rushed.
  • As I see how the child connects with the curriculum for each subject, I can better think about how much time each subject might take, and how to weave together a schedule for the year (rather than just guessing at it). Planning a schedule for the year can be overwhelming, nonetheless, so I always try to remember to take it to prayer… with God all things are possible!
  • If there are projects still left undone from the summer (fun things like making photo albums, or not so fun like cleaning out closets), part of the day can be spent wrapping up those things.
  • Doing just one or two subjects a day at the start of the school year provides a more peaceful transition from the freedom of summer to the demands of the school year… both for me as the teacher and for my children.

A few more fun ideas:

Truly, every year is different, so in case it sparks more ideas for you, here are some of our favorite memories from years past:

  • Getting toy boats and sailing them across the neighborhood swimming pool the year we were studying early American history, pretending one end of the pool was Europe and the other end America. (Another benefit of homeschooling… being at the pool while everyone else is at school!)
  • Using couch cushions to make a pretend time machine, then getting in and pretending to blast off to different time periods to get a preview of what we would be learning about in a world history year. Daddy even had the thought to play some time machine sound effects and make a control panel from a cardboard box! Each time we made a stop, there was an activity related to the time period in a different room of the house (an art project, a book to read, music to listen to…).
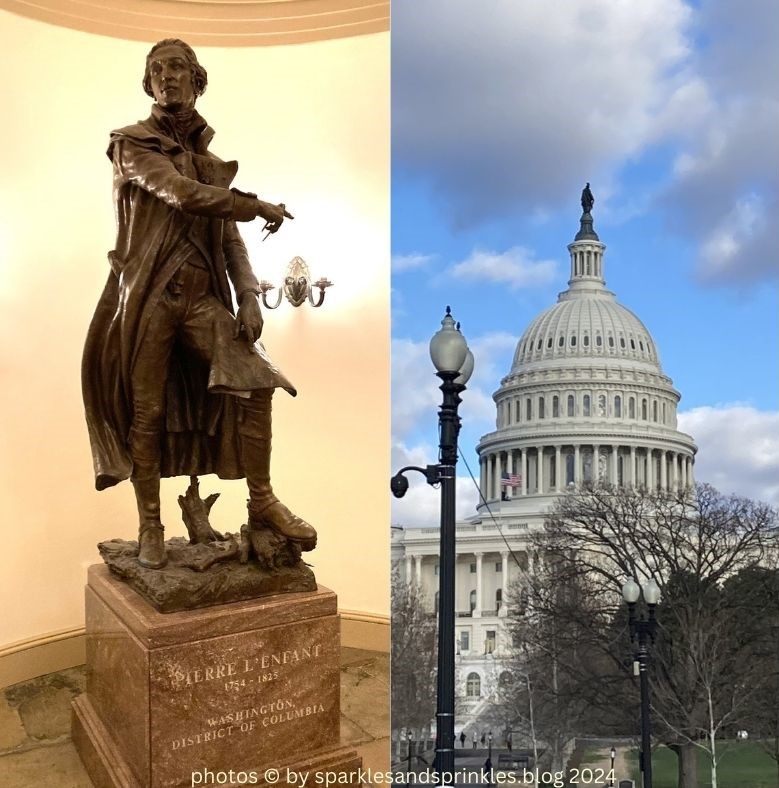
  • Spending the day seeing monuments in D.C. to kick off the year that civics was our social studies focus, then coming home and trying to make the monuments out of cake and frosting… Is it Cake? style. It was quite a mess on the counter (with frosting, cake, cookies, pretzels, and more… and yes, I had to temporarily give up my “stay away from refined sugar” norm that you see in our blog recipes.) Our girls are still asking if we can please do Is it Cake? again!?
Of course coming up with your own ideas to suit your own family and curriculum for the year is best (and most fun), but we hope these ideas might spark some ideas for you, and add joy to your school year.
May God bless you and your family as you learn and grow together!
P.S. If you are reading this in the middle of the school, you could tuck away the idea for next school year, or maybe do a week like this in the middle of the school year to add a little variety. Kind of like doing a “Just because we can day” (have heard about this great idea from Sarah Mackenzie?) but instead a “Just because we can week!”

Note:  Some links on this page are Amazon Affiliate links.  Sparkles and Sprinkles is a participant in the Amazon Associates Program, an affiliate advertising program designed to provide a means for sites to earn advertising fees by advertising and linking to Amazon.com.

Other links may or may not be affiliate links.  We provide links because we have found these products or services beneficial, and we think you might too.

Make a city plan like L’Enfant

Make a city plan like L’Enfant

Have you ever thought about the fact that someone had to design and plan the cities where we live? In this post, we share with you a little history of the designer of our nation’s capital, Washington, D.C. His name? Pierre Charles L’Enfant.

pierre l'enfant statue in u.s. capitol building

We wish we could have found a great picture book for children to learn about L’Enfant (like the one we found about Jean-Jacques Audubon), but as we could not find one, this post is full of pictures and little snippets that tell the story of the intriguing life of Pierre Charles L’Enfant, a Frenchman with a great love of America.

After learning a little about L’Enfant, we’ll show you a fun art project to plan your own imaginary city, using L’Enfant’s methods. You can even learn some French city words, with our free chart, as a nod to L’Enfant’s native language.

And, if you are up for an adventure, we suggest some places in the D.C. area you can visit which honor the designer of our nation’s capital – scroll to the bottom of this post to find these fun places.

scott berg grand avenues

A few little notes… This post was inspired by reading Grand Avenues by Scott W. Berg – it’s a history book, but it is written like an enthralling novel. I would recommend it to adults reading this post, especially those with a penchant for French and a love for Washington D.C. For children, or those wanting a quick snapshot, our post should be a nice place to start. Pictures in this post are mostly public domain images. In many cases, clicking on the images will lead to the source of the photos if you want to dive deeper. Okay, let’s learn about L’Enfant…

Who was Pierre Charles L’Enfant?

pierre charles l'enfant

Major Peter Charles L’Enfant, redrawn from woodcut (Library of Congress)

Pierre L’Enfant was born in France in 1754.  His father was employed by King Louis XV as a royal artist. Pierre L’Enfant studied at the Royal Academy of Painting and Sculpture.  One of his contemporaries was Jacques-Louis David, who became a famous artist.

academie royale de peinture et sculpture

Vue perspective du Sallon de l’Académie Royale de Peinture et de Sculpture au Louvre (1778)

l'enfant painting

Painting by L’Enfant of West Point, 1782 (Museum of the American Revolution)

Pierre L’Enfant’s family was close with the famous playwright Beaumarchais (author of plays such as The Barber of Seville and The Marriage of Figaro). Beaumarchais encouraged a group of young men at the time to travel to America to help to fight against the English in the American Revolution. L’Enfant did not have military training, but he wanted to come to America to join in the fight for American independence.

Soon after his arrival in America, L’Enfant met George Washington. George Washington was impressed with L’Enfant, especially with his artistic abilities.  L’Enfant was asked to draw a military manual for General Baron von Steuben. L’Enfant was also asked to create the medallions for the Society of the Cincinnati. Later, L’Enfant took on a bigger project, redesigning Federal Hall in New York City.

stueben manual l'enfant

L’Enfant’s drawing for Steuben’s military manual (Muesuem of the American Revolution)

When the Revolutionary War had been won and it was decided that the new country should also have a new capital city, L’Enfant was determined to be the designer of this great city. George Washington thought that L’Enfant was the one who had the genius for this job.

“Since my first knowledge of [L’Enfant’s] abilities in the line of his profession, I have received him not only as a scientific man, but one who added considerable taste to his professional knowledge; and that, for such employment as he is now engaged in, for projecting public works, and carrying them into effect, he was better qualified than any one who had come within my knowledge in this country, or indeed in any other…”

(Letter from George Washington to David Stuart, as quoted in Grand Avenues, pages 136-137)

L’Enfant explored and surveyed the land that would become Washington, District of Columbia. Then L’Enfant meticulously designed a grand city to be built there. At the time, Georgetown was a little village and most of the area that would become Washington D.C. was farmland and forest.

washington d.c. farmland

Unknown author – Library of Congress Geography and Map Division

From his tireless study of the land, his vast imagination, and artistic talent, L’Enfant created a plan for the new capital city. He created his plan on 2 pieces of handmade paper (joined together to be 2 feet by 3 feet), using pencil and watercolor for the images, and many styles of calligraphy for the descriptions.

enfant plan for dc

L’Enfants hand drawn plan for Washington, D.C. (public domain image)

L’Enfant had a fiery personality, however, and sometimes offended the other people working in government at the time. Interestingly, the plan that became engraved and publicized had the name of one of L’Enfant’s helpers, Ellicott, who had copied and slightly modified L’Enfant’s plan. L’Enfant was enraged that after all of his hard work, his name was not the one on the published plan. Due to disagreements and financial difficulties, the plan for D.C. was slow to become a reality.

About 100 years went by without much progress on the grand plans for Washington, D.C., then L’Enfant’s original plans were unearthed by Frederick Olmsted, Jr., a highly acclaimed architect.  The McMillan Commission then attempted to more fully understand L’Enfant’s plans. The commissioners even traveled to Paris to see where L’Enfant grew up and what might have inspired his plans.

Finally, L’Enfant’s plans for a grand city for our nation’s capital began to be realized.

mcmillan plan

The McMillan Plan for the National Mall

Perhaps it is because of L’Enfant’s original plans and the McMillan Commission’s work in carrying out his plans that Paris and Washington D.C. have some similarities, among them, grand diagonal avenues, long grassy esplanades, French Second Empire and Beaux-Arts style buildings, and ornate bridges. Let’s take a look…

paris map

Map of Paris in 1774

enfant plan for dc

L'Enfant's plan for Washington, D.C.

Paris - Champ de Mars

D.C. - The National Mall

Paris - Opéra Garnier

D.C. - Eisenhower Executive Office Building

Paris - Pont Alexandre III

D.C. - Arlington Memorial Bridge

Photo by Tim Evanson from Washington, D.C., United States of America

Ready to plan your own city?

L’Enfant used large pieces of handmade paper for his plan. For your plan, you will need large pieces of watercolor paper, watercolors, paint brushes, and pencils and/or pens.


L’Enfant spent a great deal of time exploring the land on which he planned our nation’s capital, deciding, for example, what buildings would look best on hills and what areas should be near water. To add even more fun to your imaginary city plan, it could be fun to spend time wandering in a country or farm area, and imagine how that piece of land could be turned into a city or town.

Once you have some ideas, start to sketch them out on your paper with pencil. Label your map in pen or pencil and add some watercolor (perhaps blue for rivers, green for parks, etc.). You could also add explanations about your map, using pen or pencil, or even try calligraphy as L’Enfant did. Decide on a name for your city, and give your map a fancy title.

If you are interested in learning French while making the city, feel free to print a copy of our French City Word Chart. Though L’Enfant made his map with English labels, it could be fun to label your map in French, L’Enfant’s native language.

If you need help with pronunciation of these city words, you could try Narakeet. Simply select French as the language, type the French word, and listen to the pronunciation.


French city words

Ready for a L’Enfant in D.C. fieldtrip?

L’Enfant was at first not honored for his great work in designing our nations capital, but now we can find a number of places around Washington, D.C. that remind us of L’Enfant’s contribution to our country. Let’s explore…

L'Enfant Plaza

L'Enfant Plaza with metro and train stops

l'enfant statue u.s. capitol

Statue of L'Enfant in the United States Capitol Building

The statue of L’Enfant in the Capitol is quite new, installed in 2022. Watch a video of the instatlation. The statue is tucked in a quiet alcove… a big thank you to our wonderful tour guide who took the time to show us this statue, though it was not part of the standard Capitol tour.

L'Enfant's tomb in Arlington National Cemetery

L’Enfant’s remains were transferred to Arlington National Cemetery about a century after his death. His tomb overlooks the capital city he designed.

Freedom Plaza in D.C.

At Freedom plaza one can walk on a stone inlay that depicts a portion of L’Enfant’s plan for Washington, D.C. (photo from wikimedia)

Is it possible to see the original plan created by L’Enfant? Unfortunately not. We read in Grand Avenues that “The only known copy of a plan for the federal city in L’Enfant’s own hand to survive into the twenty-first century rests in a refrigerated chamber in the Geography and Map Division of the Library of Congress, where it is off limits to the public because of its brittle condition and the extreme fading of its pencil lines” (Grand Avenues, pages 185-186).

In addition to the places which specifically honor L’Enfant, you could walk in L’Enfant’s footsteps by visiting Mount Vernon (where L’Enfant met with George Washington to talk about his city plans) and Georgetown (where L’Enfant stayed while exploring the land that would become Washington, D.C.).

If you are interested in seeing the artwork of L’Enfant’s contemporaries, who were also gifted artists, consider a visit to the National Gallery of Art, looking for the works of Jacques-Louis David and John Trumbull.

We hope you have enjoyed learning about Pierre Charles L’Enfant, and creating and exploring on your own!

If you love learning and creating, consider subscribing to our email updates. Simply click here to subscribe. At sparklesandsprinkles.blog, we post learning ideas and recipes, and have a penchant for all things French.

Bonne journée! Have a great day!

Note:  Some links on this page are Amazon Affiliate links.  Sparkles and Sprinkles is a participant in the Amazon Associates Program, an affiliate advertising program designed to provide a means for sites to earn advertising fees by advertising and linking to Amazon.com.

Other links may or may not be affiliate links.  We provide links because we have found these products or services beneficial, and we think you might too.

Ballerina Sylphs and Flower Fairies Tutorial

Ballerina Sylphs and Flower Fairies Tutorial

Inspired by the ballet, Les Sylphides, we decided to make some pocket sylph dolls.  They are so fun to make, and even more fun to play with.  Follow along to learn how to make your own ballerina sylphs, flower fairies, and poet dolls. Our YouTube video (see below) will guide you through each step.

les sylphides flower fairy doll
sylph and poet

These sweet little dolls may be tiny, but they require quite a long list of materials and tools. To help you in making these dolls, we’ve put together a detailed list of supplies, with clickable links. We found that the right materials are key to making these dolls.  Once you have the materials gathered, you and your children can enjoy making a variety of dolls. Each doll will be totally unique! 

Here is a list of the materials we used:

Floral Wire

Floral wire should be cloth covered, 18″ long, and 22 guage.  The guage is important.  We tried a different guage at first, and it was more difficult to bend.  Interesting fact – the higher the guage, the thinner and more easily bent the wire is.  22 guage seems a nice balance between easy to bend while making the doll, but stiff enough to keep its form when the doll is finished.  We found our floral wire at Hobby Lobby.  A similar wire can be found on Amazon.

Wooden Beads

We used 3/4 inch diameter wooden beads for the fairy doll heads, and 1/4 inch diameter wooden beads for the fairy doll bun.  For the poet dolls, we used 1 inch diameter wooden beads for the head.  This variety pack of beads works well.

Tools

For the tiny details on these dolls, we decided to get a fine tip hot glue gun. We think this type of glue gun is really helpful. This KeLDE glue gun comes with some hot glue sticks.  Hot glue sticks, of course, are also needed for the dolls. You will also need needle nose pliers, scissors, and ruler or tape measure.

Paints, paint brushes, toothpicks, and Q-tips

We used Apple Barrel acrylic paints to paint on the hair and faces. It is also helpful to have small paint brushes and toothpicks to paint on the small features of the dolls. We used Q-tips to paint the cheeks. Optionally, you may choose to apply a layer of Mod Podge to make the painted faces more durable.

Embroidery floss

We used skin-toned embroidery floss, as well as ballet pink for our fairy dolls.  We also used a variety of colors for the bodice of the fairy doll.  For the poet, we used skin tones, as well as white for the tights, and blue or black for the shirt. We like DMC floss, but a large variety pack of floss can also be nice to have on hand.

Model Magic or Wood Putty

To fill in the hole at the top of the bun of the fairy, or the head of the poet, we used Model Magic. You only need a tiny amount of Model Magic, but the extra can be used for so many other creative projects!  Wood putty could also be used.

Tulle (and a needle and thread)

For the skirts of our ballerina sylphs we used a roll of 6 inch wide tulle. You will also need a needle and thread.  For a no-sew version, simply use flower petals for the skirt.

Artificial flower petals

We used small artificial flower petals (such as daisy or hydrangea petals) for the sylph and fairy wings.  The flower fairy skirts are made from larger flower petals. We found our flowers at a local craft store.

And now… let’s make

Ballerina Sylphs and Flower Fairies!

Watch our YouTube video for step-by-step details on how to easily make ballerina sylphs and flower fairies.  (For tips on making the male poet dancer dolls, see below.)

If you would like to make the poet from Les Sylphides, follow similar steps to the fairies, but make it slightly larger.  Use a 1 inch bead for the head.  Make the arms 1.75 inches long.  Simply fold the ends of the legs to make little feet.  Use white embroidery floss for the tights and the sleeves. Use a blue or black embroidery floss to make the shirt.  Add wistful poet scarf with a small white or metallic piece of floss.  Ta da!  Ready to dance!

les sylphides doll poet

Would you like to be the first to find out when we post new craft ideas?  Sign up for our email updates!

Time to play with your fairies! Flutter… Dance… Have Fun!

Looking for more springtime flower ideas? Check out our April Showers Bring May Flowers post.  You’ll find ideas for flower crafts, outdoor flower walks, May Day and Mother’s Day baskets, and even a Flower Name Bingo Game, perfect for a springtime party.

flower bingo

Note:  Some links on this page are Amazon Affiliate links.  Sparkles and Sprinkles is a participant in the Amazon Associates Program, an affiliate advertising program designed to provide a means for sites to earn advertising fees by advertising and linking to Amazon.com.

Other links may or may not be affiliate links.  We provide links because we have found these products or services beneficial, and we think you might too.

Homemade Easter Decorations that Last

Homemade Easter Decorations that Last

Making Easter decorations together that can last for years is a special treat!  In this post, we’ll show you how to make an Easter scene with peg dolls, hand painted wooden eggs, and an Easter garland.

Easter Story Peg Dolls

Our family really enjoyed creating an Easter peg doll scene a few years ago.  Having an Easter scene provides a tangible experience for children to imagine the details of the story of Easter, like a manger scene does at Christmastime.

We chose 2 3/8 inch size peg dolls, but you could choose any size. We loved looking at the ideas on Catholic Icing. for inspiration on how to paint the peg dolls. If you are not up for painting, Catholic Icing also has printable decoupage designs to make creating the peg dolls even easier.

Catholic Icing also has a very well done resurrection story that combines the multiple gospel stories into one to make it easier for children to understand the details.


easter peg dolls

We found that getting some extra peg dolls was helpful so that our toddler could paint the dolls however she wanted to while the older children and mom and dad worked on the details of the Easter figures.  She loved painting and playing with these dolls!

good friday peg dolls

We originally made our Calvary Hill and tomb using air dry clay.  We found that the clay crumbled over the years.  This year, we remade Calvary Hill and the tomb using Model Magic.  Modle Magic is much sturdier and lightweight, so we think it will hold up better to playing.


We used a plastic container for the base of the hill, then covered it with Model Magic. We then placed real stones on the hill, and secured a wooden cross into the clay.  Finally we pained the Model Magic and stones with a watered down light brown acrylic paint. For the tomb, we began with a cardboard structure, and covered it with Model Magic, then added rocks and paint. Our 4-year-old had so much fun placing the rocks in the clay! It takes quite a bit of model magic to make the tomb and Calvary Hill, so we recommend a large tub of Model Magic.

We also remade our crucified Jesus figure this year. (Once again, air dry clay did not hold up over the years, but we think Model Magic will.) We used a wooden bead for the head to make the head about the same size and look as the peg dolls.  We used floral wire to form the body, and then covered the wire in Model Magic.  In order to easily attach the figure of Jesus to the cross on Good Friday, we tied a string under the head that fits around the top of the cross.

peg doll jesus crucified

We wrap the Jesus figure in a small cloth and place the figure in the tomb on Good Friday.  On Easter Sunday morning, the children wake up to find the stone rolled away, and the tomb empty.  We like to hide the figure of the resurrected Jesus somewhere in the room so that the children have the experience of looking for Jesus, like his friends did on the very first Easter morning. We also place flowers near the tomb as a reminder that the tomb was in a garden… and to add even more Easter joy!

easter peg dolls

Painted Wooden Eggs

We made this set of nesting eggs many years ago, and it is still a favorite to display when we decorate.  Even the youngest children can decorate eggs… our newborn at the time used her fingerprints to make dots on the egg. It’s fun to paint names on the eggs, as well as the year the eggs were painted.  

To create your set of eggs, find a wooden egg set (or multiple sets) that allows each member of the family to paint at least one egg. 

We used acrylic paints to paint the eggs, and then gave them a coating of Mod Podge.

nesting easter eggs

The year my parents had their 12th grandchild, each grandchild painted a wooden egg, and we presented them with a carton of a dozen eggs on Easter.  We got two sets of these wooden eggs (which are already painted white).

Rather than use an old egg carton, we found cute colorful cartons to store and display the eggs.

Joyful Easter Banner

Catholic Easter Garland

Creating an Easter garland together can be fun, as each member of the family can create a part of it.  If you are looking for something simple, consider coloring our Easter hymn garland (an instant download on Etsy).  For full details on creating this simple, garland, click here. Or use your own ideas to create your own beautiful banner to celebrate Easter… so many possibilities!  Have fun!

Happy Easter!

Note:  Some links on this page are Amazon Affiliate links.  Sparkles and Sprinkles is a participant in the Amazon Associates Program, an affiliate advertising program designed to provide a means for sites to earn advertising fees by advertising and linking to Amazon.com.

Other links may or may not be affiliate links.  We provide links because we have found these products or services beneficial, and we think you might too.

Thanksgiving Hymn Garland – to color and create

Thanksgiving Hymn Garland – to color and create

Decorate your home for Thanksgiving with this fun craft the whole family can enjoy making together!  You can download our FREE printable, or you can simply let the idea inspire your own creation.  And if you would like book recommendations for some cozy Thanksgiving reading time, keep reading for some of our favorites at the end of this post… Cranberry Thanksgiving, Balloons Over Broadway, Fletcher and the Falling Leaves, and The Lion and the Bird.

thanksgiving Christian banner

The banner has pencil sketch style leaf images overlayed with words from the hymn, “For the Beauty of the Earth.”

As the children colored, we realized that this would be a good opportunity to really look closely at fall leaves… there are often many different colors in each leaf.  


Our FREE Thanksgiving place cards coordinate nicely with the garland.  These are so fun for children to write on and color to make your guests feel welcome!  Click on the image to get your FREE place card printable.

fall place card
fall place card

If you would like to listen to the song as you create your banner, you might like to try this version by Michelle Swift.

Let’s make a garland…

Print the images on cardstock

Click here to get our FREE printable, and print the images on cardstock.  Some of the leaves have words from the hymn.  Other images have no words.  You can string them together in a pattern you like, using all or only some of the images.  Alternatively, you could draw your own leaves and write the words of your choice.

Color the leaves and pumpkins

Color the leaves and pumpkins.  You may want to look closely at real leaves from your yard for inspiration.  Fall leaves often really have many different colors in each leaf.

Cut out the images.

Some of the leaf shapes are quite detailed.  Don’t worry if they are not cut perfectly.

Punch 2 holes in each leaf/pumpkin

Punch 2 holes at the top of each pumpkin/leaf.  Punching 2 holes, rather than one, helps the shapes to stay facing forward when they are strung on the garland.

String the images to create the garland

Cut a long piece of twine, ribbon, or yarn.  Thread the twine (or ribbon or yarn) through the holes.  Consider the order of the hymn.  Add in wordless images if you would like to.

toddler thanksgiving craft

Toddler tip...

We found it was helpful to print some extra pages that our toddler could have all to herself.  She was quite proud of her own little banner (we love it too)!  These Melissa and Doug toddler scissors help make cutting safer.

If you enjoy making this garland, and would like to make one for another holiday (including Valentine’s Day, St. Patrick’s Day, Easter, and the 4th of July), you can find other garland printables in our little Etsy shop.

Our favorite books for a cozy fall and Thanksgiving family reading time…

(The book images are Amazon links if you are interested in finding out more about the books.)

Fletcher and the Falling Leaves is a sweet story about a little fox who is so concerned about the leaves that fall from his tree, but then comes to learn of the beauty of the changing seasons.  The illustrations are adorable!

With Melissa Sweet’s illustrations, Ballons Over Broadway is a joy to read!  The book tells the story of the beginnings of the Thanksgiving Day Parade.  We had fun making balloon puppets and having our own little parade after reading this book.

Cranberry Thanksgiving is a classic with some sweet lessons about forgiveness, hospitality, and not judging others from the outside.  We first learned about this book years ago when doing a 5 in a Row reading program, and have read it every year since then at Thanksgiving time. 

The Lion and the Bird is a beautiful story of friendship and care for others.  This book has very few words, and the pictures tell a sweetly slow-paced story.  A beautiful book to look at over and over again.

Note:  Some links on this page are Amazon Affiliate links.  Sparkles and Sprinkles is a participant in the Amazon Associates Program, an affiliate advertising program designed to provide a means for sites to earn advertising fees by advertising and linking to Amazon.com.

Other links may or may not be affiliate links.  We provide links because we have found these products or services beneficial, and we think you might too.